



Learning how to tie a tie can be confusing at first. But while the folds, loops, and the final knot may look complicated, they’re much easier to master than they seem. With a little practice, you’ll be able to tie a professional-looking knot in just a few minutes.
This simple skill comes in handy for all sorts of important occasions, from proms and weddings to big job interviews. Knowing how to tie one or two basic knot styles helps you look polished and confident in any room you enter.
What You Need Before Tying a Tie
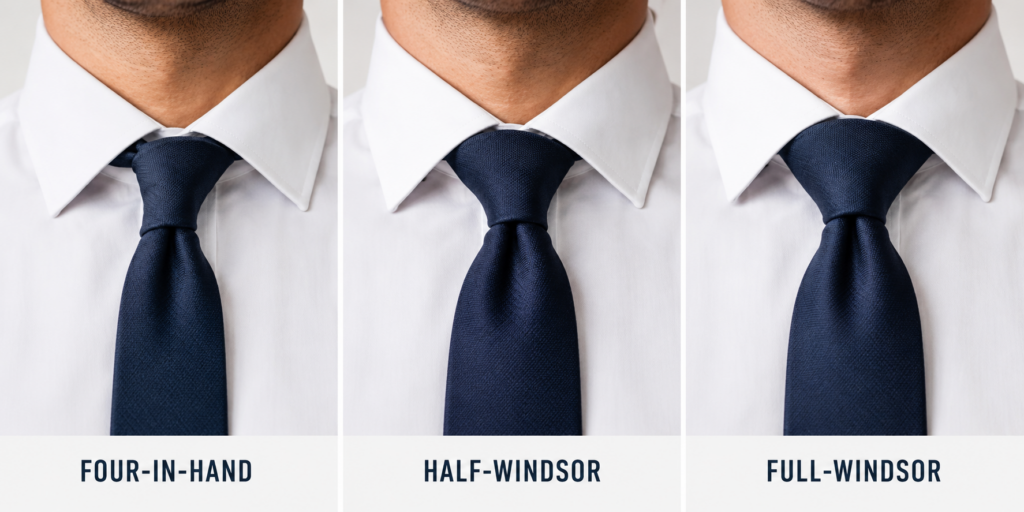
Before you learn how to make a tie knot, gather a few wardrobe essentials, including a standard necktie, a dress shirt with collar, and a mirror.
If you’re new to tying ties, start with a fabric that isn’t too slippery. Cotton and textured polyester are easy to handle and will stay in place as you practice. You’ll need a dress shirt with a structured collar to help you frame the knot and keep the tie positioned against your neck. Practicing while wearing the shirt gives you a better feel for adjusting the tie and nailing a comfortable fit.
A mirror is also crucial for beginners. Watching each step makes it easier to see how the wide end wraps around the narrow end and how the knot takes shape. That way, you can center the knot and make sure the tie hangs at the proper length.
Four-in-Hand Knot
The Four-in-Hand knot is an easy way to tie a necktie that’s appropriate for semi-formal occasions. It’s a great starting point when you want a clean, classic style. Here’s how to tie one, step-by-step, to get it right:
- Position the tie correctly: Drape the tie around your neck with the wide end on your dominant side (usually the right). Let the wide end hang lower than the narrow end, about a six to eight inches difference, and hold the narrow end steady near your chest.
- Cross the wide end over the narrow end: Grasp the wide end and cross it over the narrow end (on the left) to make the foundation of the knot. Keep the fabric flat and smooth as you do so.
- Wrap around: Guide the wide end behind the narrow end and back across the front again. You should see a loose loop forming near your shirt collar.
- Pull through the loop and tighten: Bring the wide end up through the loop around your neck from underneath, then guide it down through the front opening you created earlier.
- Tighten and adjust: Hold the narrow end and slide the knot upward toward your collar until it sits comfortably at the base of your neck. Lastly, adjust the dimple below the knot, and make sure the tie hangs straight down to your belt line.
Half-Windsor Knot
The Half-Windsor knot is a step up from the four-in-hand if you want something slightly more formal. It creates a medium-sized, symmetrical knot that’s sophisticated but not too bulky. Here are the steps to tie a tie in this style:
- Position the tie correctly: Hang the tie around your neck, with the wide end on your dominant side. Let the wide end fall longer than the narrow end so you have enough length to work with, and keep the narrow side close to your chest.
- Cross the wide end over the narrow end: Just like the Four-in-Hand necktie, bring the wide end across the front of the narrow end to form the base of your knot.
- Bring it up through the neck loop: Take the wide end through the loop between your collar and neck, and bring it back down to the opposite side to create a triangular shape.
- Pull through the loop: Guide the wide end through the neck loop again, and pull it through the front opening you formed in Step 3 to complete the knot.
- Tighten and adjust: Hold the narrow end and slide the knot upward toward your collar. Adjust it so it sits centered and snug, and finish with a small dimple below the knot.
The Half-Windsor is great for business settings and dressier occasions like proms and weddings, helping you project confidence and stay photo-ready.
Full-Windsor Knot
The Full-Windsor knot is the most formal necktie knot. Its signature triangle can elevate your outfit and help you stand out among more conventional neckties. It follows a similar structure to the Half-Windsor, so once you’re comfortable with that knot, the transition is a lot easier. Here’s how:
- Wrap across the front: Move the wide end of the tie across the front of the knot from right to left. Keep the knot snug but not tight to maintain a neat shape.
- Pull through the loop: Bring the wide end up through the neck loop, then pull it down through the opening at the front. You should see a full, symmetrical knot take shape.
- Tighten and adjust: Take the narrow end and slide the knot up to your collar. Adjust the knot so it’s centered and fits snugly under your chin without restricting movement.
This style pairs well with spread collar shirts, since the larger knot needs room to sit properly. It’s a popular choice for formal events where you want to put your best foot forward.
How To Choose the Right Tie Knot
Choosing the right tie knot comes down to the occasion and the look you’re after. Different knots change the shape, size, and formality of your tie, so picking the right one helps you dress appropriately.
Occasion
If you’re attending a prom or wedding, the Half or Full-Windsor work well because they give you a formal look that photographs nicely. If you want something more relaxed and easier to tie, the Four-in-Hand can also be worn to semi-formal events. For job interviews and business presentations, the Half-Windsor is your safest choice, striking a balance between professional and approachable.
Collar Type
Match the knot to your shirt collar so everything looks proportional. Spread collar shirts pair best with wider knots, like the Half and Full-Windsor, since they fill the space without awkward gaps at the neck. Point collars work better with slimmer knots, like the Four-in-Hand, because a large knot is too bulky for a narrower opening.
Personal Style
Think about the impression you want to make. If you prefer a more formal look, go with a Full-Windsor. If you want to appear classy but not overly formal, the Half-Windsor is a solid middle ground. For a more breezy feel, the Four-in-Hand creates a slightly asymmetrical knot that looks easygoing and effortless.
How Long Should a Tie Be?
Getting the length right is just as important as choosing the knot. A tie should end right at your belt buckle — too short looks awkward and unfinished, while too long can throw off your proportions. As you adjust your tie knot, check the length in the mirror. Small tweaks and adjustments go a long way in helping you look put together.
Common Tie Mistakes To Avoid
Even a great tie can look off if the details are wrong. Here are some mistakes to watch out for as you’re getting dressed:
- Incorrect length: A tie that sits too high above your belt looks awkward, while one that hangs too low makes the outfit look sloppy.
- Too-loose or messy knot: A loose knot can slip over time and lose its shape, but a tight knot will stay in its original position just below your collar.
- Wrong knot for the collar: A large knot can overwhelm a narrow collar and look crowded, but a small knot under a wide collar can leave too much empty space.
- Twisted tie: A twist in the necktie distracts from your outfit and looks careless. Always smooth the fabric of your tie to keep the line straight.
Confidently Choose a Tie With Men’s Warehouse
A few small habits can make a big difference when learning how to tie a tie. Once you get the basics down, fine-tune your technique so you make a knot without overthinking every step. Running through the process until it feels natural is the secret to getting it right every time.
But just as key to feeling great is choosing the perfect tie. That’s where Men’s Warehouse can help. We have ties for every occasion, from a formal dance to a business event. Our wide selection of accessorities and formalwear, plus our expert guidance, will guarantee you feel confident no matter the setting.